
Hello lovely ladies !
Its been so long since I blogged so long I nearly forgot how to do it !! Not only that but I don’t know how to start except to say I have missed you all and apologize for not visiting.
For those of you that have followed me in the past a little update on my health, am finally without crutches yippee !!! am back to work a few days a week for a couple of hours at a time. Mr P has been amazing through it all and I have been spoilt rotten ( thoroughly deserved of course ) While I’ve been away I’ve been crafting for myself and I really enjoyed it I have to say . So much so I joined a few FB groups mainly about die cutting , as you all know I love my Cameo and was lucky enough to receive the Cricut Explore another electronic die cutting machine from my mum for Christmas so now its double trouble and double the mess.
Ok so why am I here ? well……….the lovely ladies on my FB groups have asked for a tutorial on how I make my shadow boxes , many asked for a video but I don’t have a camera of the video variety and I can just about manage my blog ! so here is my tutorial in picture form BE WARNED PHOTO HEAVY.
Before I continue I would just like to point out that I am no expert, this is the way I do it and I’m sure there is an easier way to do this so feel free to jump in and help out.
Ok here goes , what you will need
A picture frame ( I’m using a Ribba frame from Ikea 23 x23 cm )
An electronic cutting machine ( I’m using my Cameo , what a surprise ! )
Card stock of your choice I find 220gsm Canson to be adequate
Vellum at least 110 gsm
Led tea light or strip light mine are from ikea, I use the Ledberg strip light as you can stick it to the wall and you can make it as long or short as you like
Adhesive of your choice, I use my 3m ATG for this
Here is the finished product so you don’t fall asleep or get bored in the middle
I’ve used two Silhouette studio files, firstly the blinds Design ID #19600 and the children Design ID #69877 both can be found on the silhouete store both of these designs are by Hero Arts.
This is what the Ribba frame looks like taken apart, its shown here without the glass or back cover.

The square paper frame insert is not used in this particular shadow box so go ahead and put it to one side .
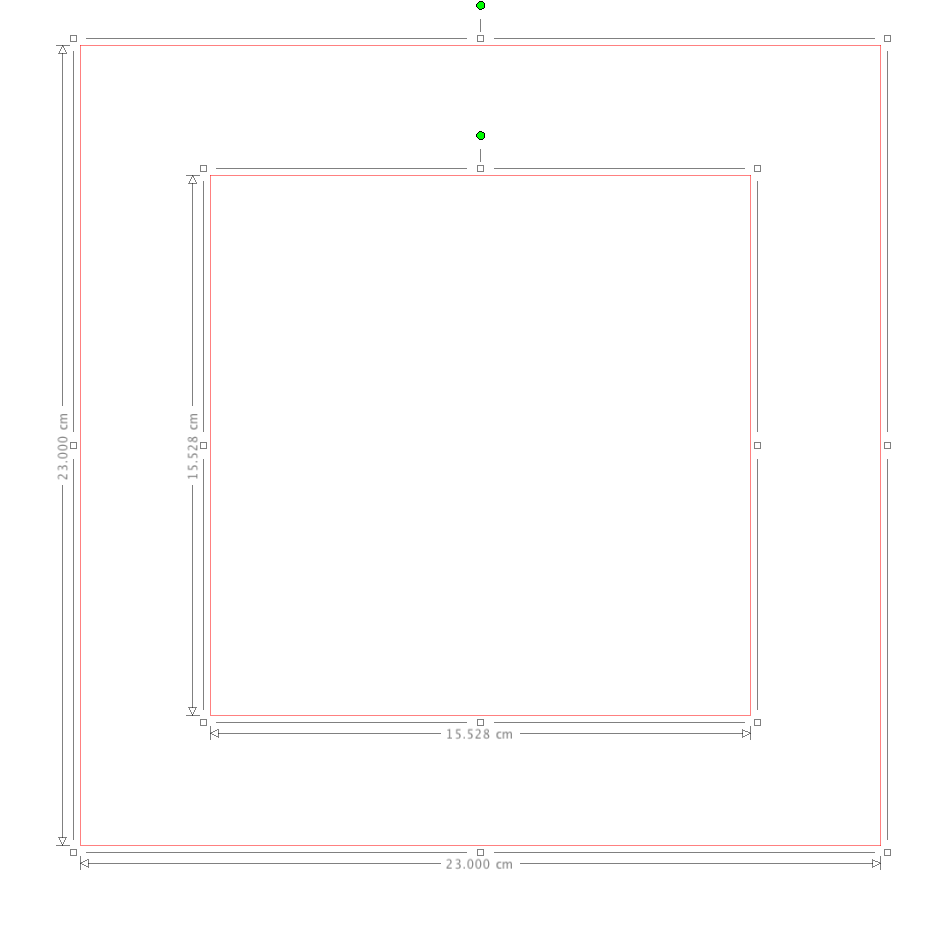
In the Silhouette software I make a square 23 x23 cm and offset it to the desired size depending on how much or how little I want the central design to show . In order to weld the images we have to make a compound path otherwise when we press the weld button everything disapears . Thanks to you tube I was able to figure this out many moons ago as this kept on happening to me, thank goodness for you tube ! So for those of you that dont know how to make a compound path just select the inner square making sure that is in the centre of the larger square , you can use your align tool for this , then hold down the shift key and select the outer square both will become highlighted next select make compound path.
Ok so now we are ready to insert our first design in this case the blind

Make sure that the edges of the blind overlap slightly the inner frame otherwie they wont weld, select the weld button and you should end up with the picture below, hit the cut button and you’re good to go. I use speed 7 or 8 pressure 33 and speed 4 for this weight cardtock oh and I have to double cut too.

Were ready to make the second frame using the same procedure as for the first above just make sure that your images for the blind and the children are of a similar size internally so that they line up nicely in the frame.

Last but not least I cut a piece of vellum to fit the back of my frame which is 25 x 25 cm.
On to assembly

Here I have inserted the blind with the good side facing outwards and on top of that the wooden picture mount that comes with the frame its the third item in my second photo this gives depth to the images.

The children are placed on top of the photo mount and then secured with the metal clips inside the frame.

This is what it looks like with the vellum attached to the back, I use my atg gun to do this it sticks pretty well but can be removed easily it I want to change the inside. Just to point out that mine are sitting on a narrow shelf in my craft room they are not hanging because I like to have them lit by Led lights . If you want to hang them you can place the vellum directly on top of the last image and then close with the metal clips that way you are able to hang them
This is what they look like lit up


I was overwhelmed by the response to these boxes on FB and for all of your lovely comments and questions. I do hope this goes in some way to answering all of your questions but please feel free to leave comments and ask away. Please bare with me on replying as I am sharing these on three FB groups as it takes a little time getting back to you all.
Wishing you all well
Take care
Marie

Brilliant news, welcome back I have missed you.
Kath x
Hey ugly bum, Welcome back! I hope this isn’t just a one off. I have really missed you blogging. LOVE all of your shadow boxes. TFS the tutorial.
Hugs, Flo xx
Missed you too PF hopefully its the start of my return
Wonderful explanation! This means a trip to Ikea is coming up! So excite to try your technique!
thank you for the instruction information.
THANK YOU SO much ( From Texas) for doing this tutorial for us. Your work is nothing short of SPECTACULAR !! I look forward to seeing more of your creations and plan on going back and reading through your blog !
I was thinking about you the other day, wondering what state of repair or disrepair you were in! Lol! Glad to see you on my ipad again! Your shadow boxes really are fab, I’ve never quite got to grips with my Silhouette but you madam are an expert! I myself haven’t blogged for a couple of months, no reason other than I kinda got fed up with it, I still drop in on other folk though, I prefer other folk’s ramblings to my own! Take good care and see you soon! Xx
Sue hello lovey to hear from you am doing much better but havent managed to get back into my ” sling backs ” lol will pop over and say hi later on
Missed you too Kath I could do with a good laugh
Marie, thank you so much for the wonderful tutorial. I can’t wait to try making one of your creations myself! Your shadowboxes are so beautiful and unique – you’re quite the talented lady!
Marie, I”m super super excited that you were sweet enough to share this wonderful design of a shadow light box! You are very talented and I’m just in love with your designs. Thank you again for your tutorial on these. You are a inspiration to me!
Lovely to see you back blogging Marie, these are gorgeous shadow boxes.
Yvonne xx
How wonderful to see you back in Blogland and I am so pleased to see you are up and about a bit more. Huge hugs xx
So happy to see you back posting Maria!! 🙂 LOVE your shadow box creations … they are all so fantastic, but even more amazing with they are lit! Thanks for the tutorial. Loll xx
WONDERFUL to see you back here 🙂
AND with a fabby tutorial too.
Thank you so much for the tutorial. I love the work you’ve been posting on FB and it’s really good of you to share your techniques. x
wow, wow, wow! What stunningly gorgeous creations, Marie! I love them very much! I am so pleased to hear you are well on the mend. Well done Mr P for looking after you so well
Thank you for sharing, im pleased you opened your blog again, you explain it much better in here :).. Love your work! please keep sharing all your shadow box tuts, I love them all.
Hi Marie – so good to see you in blogland again, and I’m so pleased that your health is much better now.
Love your beautiful shadow box scenes – they really come to life when you light them.
Take care – Sylvia xxx
Thank you for the tutorial; your shadow boxes are beautiful. I am a Cricut Explore owner and hope you will create some of these beautiful things using the Explore.
Thank you so much for his tutorial. I’ve been admiring these on your Facebook, they are stunning I’m deffo going to try one of these x
Made my pilgrimage to Ikea today to get some Ribba frames! Have you ever done the 4×6 ones? Am thinking of something simple for mothers day. I hadn’t figured out the part about making the frame and welding the first layer to it! Really great! Your boxes are fabulous!
Hi. Your shadow boxes are amazing. I am itching to have a go. Please could you tell me which led lights from Ikea you use? Thanks
thes are so increbly awesome!!!
I totally want to purchase the woman image behind the shades (I believe she’s in the kitchen) that is sitting on your desk. Can you please direct me to the appropriate place? Suuuuccchh BEAUTIFUL work!
pure beauties, thank you!
These are beautiful you do amazing work.
Marie, you sly dog! You’ve been on my mind so I thought I would drop in just on the odd chance you might have posted something and I see you have! I’m so happy to hear that you are walking again without crutches and back at work! And I’m delighted to see that your wonderful talent did not suffer any ill effects! Your card for Sandie is gorgeous and your shadow boxes are magical! Thank you so much for taking the time to do the wonderful photo tute!! I wish you continued good health and I hope to see you back again soon!! Hugs, Darnell
I am just wondering – I love this project but I’m wondering what size vellum you used on the back – 12×12 cut down?
I am about to attempt your beautiful Shadow Box and was wondering, do you leave the glass off or do you use it? TIA .
It depends actually it on how many layers you have I FIND IF ITS THREE LAYERS THEY DONT FIT WITH THE GLSSSS SO I REMOVE IT
Hi! I’m not sure where you place the tealight/LED strip. Is it on the frame, on the wall behind or on the shelf the box is standing on?
Pingback: Guest DT Member for City Crafter ” On Cloud Nine “ | baileyrosy
I know this is a little late, but I just found this post. I can’t wait to try it!! They are adorable!! Thank you so much for sharing!!
I have noticed you don’t monetize your site, don’t waste your traffic, you can earn extra cash every month because you’ve got hi quality content.
If you want to know how to make extra bucks, search for: Mertiso’s tips best adsense alternative